Energy saving projects around the house 2
Posted by Peter Boon in Energy savingTags: lamp conversion Add comments
To make the most of this Christmas I decided two write my second column. In this article you can read about how to transform a 300W halogen fixture to one that allows an energy saving light bulb. I have done this just to demonstrate that it is not hard to find energy saving projects at home, if you are a bit handy.

This article is meant for people that have some knowledge about electronics. At least to the point that it can be dangerous, if you do not know what you are doing. And it helps if you do not have two left hands…
2nd of 3 projects:
- Hidden power usage in your home. See article “
-
Retrofit your house with energy saving lights (this article)
- Pentium M laptop as server.
Enough has been written about the ups and downs of energy saving lights (See many articles on this site). I assume you know that they have different properties than traditional light bulbs, like color temperature, ‘boot’ time and such. So think carefully before you decide to change a fixture. Changing to energy saving light WILL change the ‘light experience’ in your house. And remember that after a complete retrofit of a fixture (as shown in this article) a way back is often not that easy.
I decided at some point to exchange all traditional light bulbs with energy saving bulbs. For most fixtures this is not a problem. Just exchange:
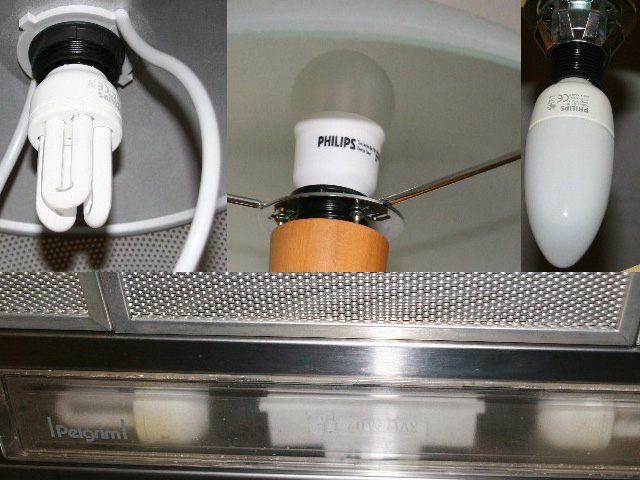
Different types and applications of energy saving lights
But sometimes more drastic measures are needed. They range from providing more space for the usually larger energy saving lights to complete rework of the fixture:

Standing fixture retrofitted with energy saving light
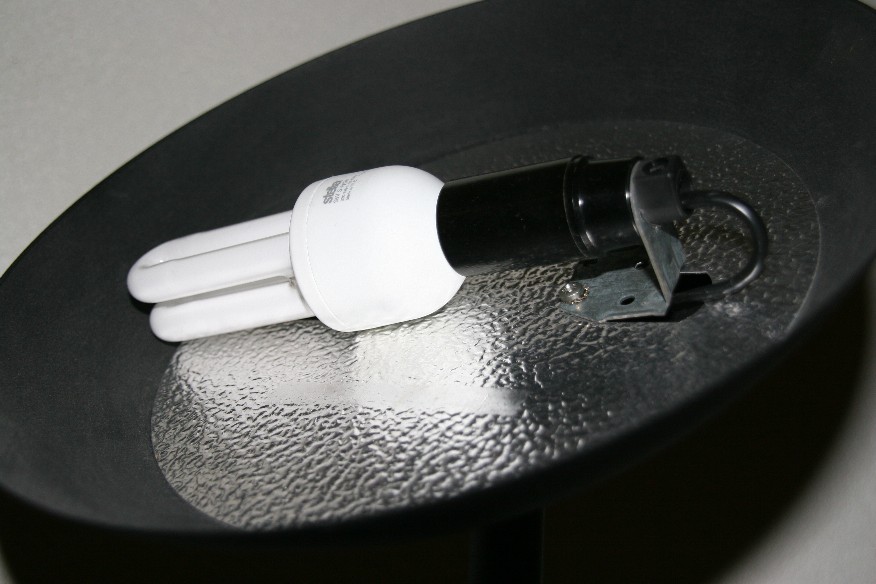
Hey where did the halogen go?
The picture above shows an energy saving light on a place where there used to be a 300W halogen light. The fixture is fairly easy retrofitted as I will explain in the following sections.
Dismantling the fixture
See the picture below for a visual representation of the following steps:
- Unplug the fixture. Always good idea to do… 🙂
- Remove the halogen light. It is placed in the ceramic contacts
- Remove the reflective plate. It is connected by several screws. Save the screws!
- You are now left with a kind of U shaped piece of metal with ceramic elements on both sides
- The U shaped metal is connected to the base of the fixture with a nut. Also the wires run through the nut and the nut itself is a place holder for the Protective Earth.
- If you can not reach everything easily you should remove the U shape.
- Remove the wires connected to the ceramic elements. If it is not that easy just cut that away (leave them as long as possible)
- If needed you can extend the wires later on.
- Remove the ceramic elements.
- OK now to the dimmer. Most standing halogen fixtures have dimmers. This one should be removed as you can not dim standard energy saving lights. I assume that people that undertake this are familiar with electronics and know how to do that.

Sketch of the original setup
Putting it back together in a different way
I always keep lot’s of stuff so i was fortunate to have a few things lying around. I had a lamp holder with mounting bracket from a demolished cabinet that came in handy for example. (Finally something that I haven’t kept in vain;)
Anyway all the stuff i use can be bought in a handy store near you.
- Make sure the fixture is still unplugged from mains…
- Attach the power plug (needed after removing the dimmer hardware)
- If needed put back the U shaped piece of metal back. Make sure you attach the PE wire. Especially if the fixture is made of metal!
- Strip, if needed, the wires
- Check if the wires are long enough
- Put the reflective plate back without screwing it in place. Make sure the wires are fed trough.
- Dismantle the lamp holder (see picture)
- Attach the wires to the lamp holder. Connect N to the screw thread of the socket. Connect the phase (L) to the bottom part of the socket.
- Assemble the lamp holder again
- Now you can attach the new lamp holder with mounting bracket using existing screws holes (reuse the original screws!). This also fastens the reflective plate
- Screw in the energy saving bulb of choice and presto.

Sketch with new lamp holder
A few examples regarding the use of energy saving light i.s.o. the traditional ones:
| Fixture | Original power usage | After retrofit |
|---|---|---|
| Halogen | 300W | 6W |
| cooker hood | 2x25W | 2x6W |
| ceiling lamp | 6x60W | 6x9W |


May 3rd, 2008 at 9:11 pm
What an interesting article! I don’t know if I’m up to the challenge of repeating your retro-fit of the lamp, but it does look do-able.
We are having some discussions in the U.S. regarding disposal of these new bulbs because they contain small amounts of Mercury, which is poisonous if the bulb is broken. This mercury then ends up in landfills, which can leak into underwater ground water. In The Netherlands, do you have any special procedure for disposing of these bulbs?